Spring Week 6
4/5/26
Continuing with re-renders, so far scene 1 is rendered out, along with 2A, 2B, 2C. 2I.2 and 2J still need to be re-rendered along with shots from scene 3.
Spring Week 5
4/5/26
Most recent edit
Shots that need to be re-rendered
1C
1E
1F
2A
2B
2C
2D
2G
2I.2
2J
Spring Week 4
4/5/26
I have passed off the renders to our compositing and editing team for next weeks due date.
Spring Week 3
4/5/26
Continuing on revisions this week and getting new renders before class 10, re-lighitng is finished so I will just be getting out renders for the next edit.
Spring Week 2
4/5/26
Over the weekend I worked on revisions based on critique in class. I have made a lot of scenes brighter and more exposed and I am planning to start re-renders as soon as I get more feedback. I have also gotten the eyes in 2I.2 and I got some more direction as to what is wanted with that shot. It will be a dark shot with mainly the eyes being seen.


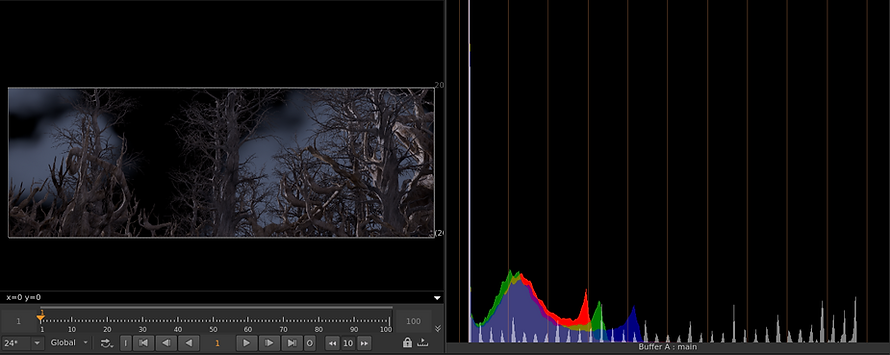
This is where they are currently, I have scene 1 and scene 2 up to date and only missing 3D and E.
Spring Week 2
4/1/26
Now mostly everything has been handed off to be comped, by Monday the 6th there will be a new edit to show and hopefully good critique and not many re-renders. Next steps for me is to wait for critique but now we are moving on to the hero shot and getting all of the elements together for it.
Received critique from my Professor, underexposed and I should bring everything up, color discrepancy, don't try to get final with the render.
Spring Week 2
3/30/26
Most renders are done there are a couple that are still being rendered. I still need to render 2I.2 with the eyes, needed some guidance from my teammate/director Hannah. I did not know what the concept or desired look was for the shot with the monster. But it will be rendered this week. Also the eye is done.


Spring Week 1
3/25/26
Still working on the eye texture for shot 2I.2 almost done with it. Getting ready to start rendering this weekend which will go much more smoothly thanks to my teammate Sydney who created a render spreadsheet with everyone's shots and whether or not it is rendered and submitted.

Spring Week 1
3/23/26
I have started on my Eye texture that I need to get done for this week, I started by making it procedurally in COPS in Houdini. I have just been layering noises on top of each other make make a "eye look". So far it looks alright not where I want it to be, there are a couple other methods I might try to achieve the look I want.


Winter Week 10
3/9/26
Final comp for this quarter, still needs work and clean up and some re-renders. For next quarter I need to finish re-renders for scenes 1-3 and create an eye texture for the monsters for the "eye shot".
Winter Week 9
3/2/26
I have updated the shots 1A, 1B, 1C, 2A, 2B, 2I. I will get any other shots that I can updated, I have rendered a separate pass of the clouds for 1A to be comped, this will lighten render time make it easier for work flow. But those renders are done and have been passed off to Sydney and Olivia for comping.
Winter Week 8
2/21/26
Renders for next checkpoint are done and comped. However because of the previous issues they will need to be re-rendered and lit. Some environment changes will be done for last checkpoint this quarter. My next goal is to get shots 1A, 1B, 1C, 2A, and any other I can get cleaned up and re-rendered. I chose these shots cause I think they are the closest to being final.
Winter Week 7
2/19/26
I have ran into a lot of rendering issues through SCAD's render farm. Some issues are user error and some are farm issues that we will have to find a work around. First the farm was struggling to render my VDB so my fog and clouds. Either they would not be there or they would be very dark. I fixed this issue by fixing my samples and re-uploading my geo and textures to the render farm. But other than that the farm is having a hard time with color space. We are rendering in ASUS and when I get my renders back the color space is all wrong either very over or underexposed. When fixed in nuke it still was wrong and not what I was seeing in render view. I was also getting normal farm errors with missing frames, corrupted frames, missing geo, missing textures, or it not reading the render. Overall the load was a lot more than I thought it would be with exporting the USD's and rendering. For the final render I will be getting more help and split up the shot list so it does not take a full week to render
Winter Week 7
2/14/26
Deadline is almost here, Scenes one and two are fully lit. Finishing scene 3 and getting ready to put everything through the farm. I have the final texture for the deadline another environment change. We had a pipeline issue and some environment updates were missed with putting the textures in. Otherwise rendering is ready
Winter Week 6
2/10/26
Wrapping scene one for the Feb 16th deadline. Currently we do not have all of the texture in for our environment so this lighting is due to change when those things are put in since the snow and other trees will affect how the light bounces in the environment. Main changes made in this update are the clouds, fog, and main light. I put clouds in for more depth in the scene and to fill space that felt empty. I used a sky box node to do this, I will change this to a card or matte painting because the volume for the clouds makes the render times longer. With the fog I have fully moved on from the karma fog box because it was not getting the desired result I wanted and I created my own fog using a VDB and volume. Lastly I changed from using a directional like to a karma physical sky because it filled out space better.


Winter Week 6
2/8/26
Environment has been updated by my teammate Mia. It now has updated trees with textures done by my other teammate Benji and all the cameras have been imported from the XR stage into this scene. So now for the 16th of February I will have all shots with lighting and rendered. I have started with the general set up I had previously with an HDRI, distant light, and fill lights needed either for volumetrics or to brighten up shadows. So far the issues I have encountered is balancing the fog volume with the normal lighting, unfortunately the fog box is still consistently making things washed out, gray, and flat. I partially solved this by using a light linker and making sure the only lights being affected were the ones that needed to be.
As of right now everything looks washed out, planning on talking with Sydney to talk about color correcting and what direction we can go with that.


Winter Week 5
2/2/26
I have gotten a general lighting set up that I can use for all of our shots, adjustments like exposure and direction will have to be adjusted on a shot by shot basis. But I am happy where the volumetrics are and I have also talked with my teammate Sydney about having less fog in Houdini and adding it on Nuke so it does not look flat. This is something I am open to trying but I think the reason it looks flat is there is not enough geometry in the scene. Additionally I have worked out a plan with Mia for the environment, she will get me a new environment by Wednesday or Thursday for me to work on. These will have all of our cameras in place including stills. Only shots that will not be included are the environment shots because those need to be worked out with our effects. Finally I have a deadline of February 16th for getting all of the lighting done for each shot.
The only current issues we are having are figuring out a procedural way to cull our geometry to camera for each animated camera we import. Also still with the HDRI I think at this point we will have to figure something else out like adding clouds or a matt painting for our sky.
Winter Week 4
1/31/26
I have taken my testing into our scene. In this render the fog is too dense and I am losing way too much detail from the environment. But the light is now doing what I want it to.

Here I have taken down the fog density but I have also called to camera with the geometry so that I am not rendering the full environment at once. Before I was having super long render times for just one frame. Biggest issue is this is just a black background so I cant tell how this would look with a HDRI or a matt painting. The HDRI is not working with the imported camera currently and I am trying to find a fix if there is one.

Winter Week 4
1/29/26
I have now gotten a updated scene from my teammate Mia with the new pathing of the environment, I have also now started to re-light this scene. I am still having some troubles with the volumetrics so I took a tree asset into a new scene to do some testing.

I made a set up with a will with holes in it and an HDRI. I used an area light with the karma fog box and put a sphere in to I had an object to reference. Here I found the volumetrics working perfect, I can see the light coming through the wall and it bouncing in the fog.

This is now the tree with the same area light and fog box as before on a black background. The tree is not blocking as much light as I would like it to so I moved the light closer while also changing the the parameters to focus the light more with the spotlight feature. I also found that making the shadows softer helped with getting bolder shadows in the fog.

This is the result and I like this much better, it is visible in the camera with the HDRI, I also made the light a lot more focused so I will use it as a key light then use a HDRI or a sky light for fill and the night sky in the actual scene.
Winter Week 4
1/27/26
Continued to work on the lighting in our scene getting some good volumetrics. But I noticed that the pathing for the environment was off. It was too narrow and causing the trees to be very cluttered and unnatural. I also thought that there were not enough trees in the scene for it to feel like a forest. my teammate Mia created the environment and she agreed with me on these things to we started to look for solutions. Our classmate was actually able to help us telling us that with the mountain paint tool, which is what Mia used to create the path, we are able to distort it with a mask. This was you are able to "widen" the path. in the end this was able to get us a better looking scene that should help make it easier to light.

Winter Week 3
1/22/26
Today I put lighting into our scene using an HDRI, a disk light and an area light. The HDRI helped get the mood I think I want to go for but I want the scene to be cool and isolating for scenes one and two. So I am opting for cooler lighting and trying to get that to work. I have also started some volumetric lighting tests, so far it has been kind of successful.

The way I am currently trying to get volumetrics is by using the karma light filter and the gobo filter. The gobo filter uses an image and through that creates more dynamic volumetrics, I have not tried many images but if I can instead use a noise map I would prefer that.
These are the settings I am using for the fog box inside of karma

This is one of my results, the volumetrics are barely visible and I want them to be more striking, another issue is that the light one the ground is very bright.
This is another one of my results, I like the volumetrics in this a lot better. I think it is underexposed due to the increased fog volume. I also am afraid of the fog taking away a lot of background detail when that is added.

The next task I am going to do is try to find a better way to get dynamic volumetrics, I don't like using a image that is then projected by the light I would rather use a noise map. The issue I have ran into with the noise maps however is they seem finicky with the light gobo. I might have to switch to the light gel instead and see if noise maps will work with the fog.
Winter Week 3
1/20/26
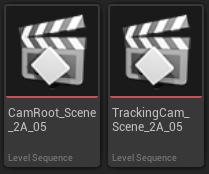
Update on exporting the cameras. For the past couple days I have been struggling with exporting the camera with the information from the XR stage. We got one shot out by doing what I said in the previous post but for some reason this same method did not work for other shots. One thing that made this difficult was that the sequencers are read only. Meaning I cannot manually bake the cameras before they are exported or manipulate them in any way. in addition to that when imported to other programs none of the information was there. But since then we have discovered another way, my teammate found that you can copy the file of the sequencer into a new unreal file which makes it so it is not read only. So she exported and it worked going directly into Houdini. I found that if you open the "tracking cam" in the subset files then export just the tracking cam into Houdini it will work.


Winter Week 2
1/17/26
Since shooting on the stage we have now gotten all of our camera information which will now need to be exported from Unreal Engine 5 into Houdini. Main issues we will have to fix is camera location and frame range. In unreal the frame range is about 917,000 - 919,000 and the camera was hundreds of units away from 0,0,0. In Unreal Engine I was not able to figure out how to change these things as it was not allowing me to manipulate the sequencer. So my next thought was to just export and fix these things in Houdini. However while trying to figure this out we ran into some issues. Exporting the camera information from Unreal Engine was successful. We had all the information we needed but it was not importing into Houdini. It would be brought into the scene with no keyframes or just one keyframe. But the camera would import into Nuke and Maya with all of its information. So the solution I found was to bring the camera into Maya and copy and paste its keyframes starting at frame 1 instead of 917,000. Then importing that camera into Houdini to then set its origin to 0,0,0. This did work, so this was the strategy used to fix our cameras in order to import them into Houdini.
Winter Week 2
1/12-13/26
These were our shoot days on the XR stage, we had gotten all of the shots that we needed to get done with our actress. The blue screen idea for the stage worked wonderfully. I was the main gaffer on set making the lighting was correct matching what we wanted from our story boards, my diagrams and the path that my teammate made. Some minor adjustments had to be made just for some logistical reasons or to make post production more smooth, such as moving a light off camera and adjusting its angle.
But here are some pictures taken from on set.


Winter Week 1
1/5/26
Over our winter break I created a blooming flower procedural animation, for more information on that go to the blooming flower blog.
But going into Winter week 1 we will be filming on the XR stage next week and I will be gaffing. I need to create our lighting diagrams for the shoot mainly our more stylized shots since there is some intense lighting shots. But generally the light will be very even on our actress with the main goal being to have no blue spill on her from the stage.
Here are the lighting diagrams I made in photoshop, they are mainly for helping me think through some of the setups. For these shots specifically they have the most unique lighting as compared to the other shots we have where the lighting is generally evenly lit.


This is a map for where the fairy is running, it was made by my teammate/director to help me get a good idea as to where the light should be hitting the fairy throughout the film.

Fall Week 9
It is coming to the end of the fall quarter and my team have come to the decision to make a pivot with our project. Originally we were going to use the XR stage with a environment created in unreal engine 5. However with the stage there is a lot of parallax when filming and it does not give us the result that we want. So we are going to use the XR stage as a giant blue screen instead. It does defeat the purpose of the stage however this fixes the parallax issue and makes for a much easier time when comping in our live actress. Additionally we do not have a normal bluescreen stage so this is also a way to have a bluescreen. So moving forward with this project we will be transitioning to Houdini. This way we will have photorealistic renders and a better style for our film.
Fall Week 8
Fall Week 7
Version 3 for the environment is developed. It resized the environment and the geometry so the file is not as large and easier to transfer. The scale is a little upscaled so that when the actress is comped in from the green screen stage she will look small in the environment.
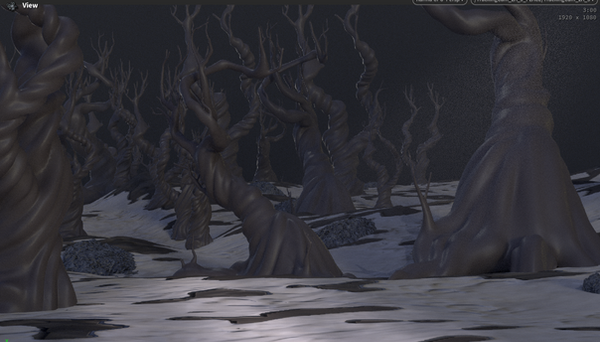
These are screenshots from some lighting tests. It is too dark right now and I am struggling to balance the brightness of the scene with lighting up the trees. The texture on the trees is very dark so while other parts of the scene read as nighttime the trees are under exposed.


Fall Week 6
I have gone back to lighting our environments since I have received version 2 of the environment and started to set that scene up for camera movements and lighting. I have a lighting setup using a directional light, sky light, height fog, an atmosphere, and a sphere was set up to replicate the night sky. The biggest problem I have is lighting everything to look like nighttime and not have anything be under exposed. Some areas are being lit too much and others are mud.

This lighting is closer to what I want, it is soft with the volumetric rays and nothing is too muddy

But transitioning to this scene it is way too bright to be a night scene and needs to be darker
Fall Week 5
I have started on creating a growth sim in Houdini. For the last shot in our short film the forest our character is in will be brought back to life and I am coming up with ways to create a growth sim that will look realistic and be quick. I started in unreal with a quick test. Using the motion design tab in unreal I created a cloner that will clone geometry into a shape of other geometry. I used grass that will take the shape of a statue. I then used an "effector" to spawn the grass onto the statue and finally another actor to animate the grass growing onto the statue. This would be great for background effects, it does not look very detailed and would not be a good choice for any close up shots or anything close to the camera.
Fall Week 4
I continued to explore the lighting in the concept scene. Using the same exterior lighting setup as the last post. I have changed the color of the scene and taken inspiration from the lighting in Nosferatu. In the carriage scene I like how they light the focus of the scene and leave a lot of the background as silhouettes. I think applying this to our project would be very beneficial to us because it will cut down on render times and load.

In this rendition I wanted to really push the god rays. The way to do this is unreal engine is to put an object in front of the key light and turn up the exponential height fog. I also made the scene more green because it brightens the scene up and I think is a better color than a deep blue. I have also added cards with a mask of an image of fog. I think this works well to break up the scene and set a better focal point. I am not set on the camera angle but that is due to change since the scene will change and the camera will be following our actress.
The critiques I have are the camera angle is not the best I think putting it at eye level of a normal person will net better results. I also think along with moving the camera the angle of the light could be changed to reflect the moon more accurately. I also do not like the harsh shadow coming from the main tree.

Along with that I have noticed strange shadows coming from the rock geometry I have not found a fix but these shadows do not react to changing the light.
Fall Week 3
During Week 3 I gathered more reference for lighting, instead of looking at Pinterest for just images I was looking into films with huge snow or desert scenes. Mainly looking at how they were lighting those environments. The two films I looked into further was The Thing and The Revenant, both of these films use horror elements with monsters and use lighting and the camera work creatively to convey that. In The Thing you cannot see past their camp, the only lights are coming from the buildings or lights and it adds to the feeling of the unknown. In slight contrast The Revenant is a lot brighter and the audience can see much more of the forest but the camera work with the narrow angles is how they got their horror elements.
This scene utilizes a basic set up with a directional light, a spot light, a sky atmosphere, skylight, volumetric cloud, and exponential height fog. Critiques I have are that the blue one is too dark, I am loosing lots of detail and it is too dark of a blue. It looks as though it is underwater. The lighter colored scene is also too dark it does not look like it is lit up by the moon but instead like its a street lamp.


Fall Week 2
During week two I continued testing the snow in unreal engine 5. What I was mainly looking for was how detailed I could get the snow to be and how heavy the simulation will be when I use geometry instead of particles.
I found that the simulation is light and I don't need that many particles to get the simulation to work. Adding materials and transparency does make the sim heavier but not by a huge margin.
To wrap up the week the simulation is getting better and looking like a good option. The next big test will be putting it into the actual scene we will be using and how it will effect that render time.
Fall Week 1
I am trying to decide if we are trying to do our snow effect in unreal engine 5 or in Houdini. I am testing unreal 5 first and this is a very early test of what snow could look like.
Next I am going to see if I can change the sprites of the snow to get better detail and see how taxing that will be on the system.